Is your Mac running slow? Usually, a sluggish Mac points to a lack of storage space. But you must not get flustered and start hysterically deleting files.
It is crucial to first identify the real reason behind the storage hog. This guide explores the different ways you can check and identify storage hogs, along with tips for reclaiming space.
Identifying Storage Hogs
- Use the built-in tools
Your Mac comes with built-in tools that make it easy to check Mac storage and identify the culprits that are making your system slow. Some of these tools are:
- Disk Utility – Disk Utility is meant for power users, and once you open this tool, you will get a comprehensive view of the different volumes on your Mac. However, if you are a casual user, this might be a bit of an overkill.
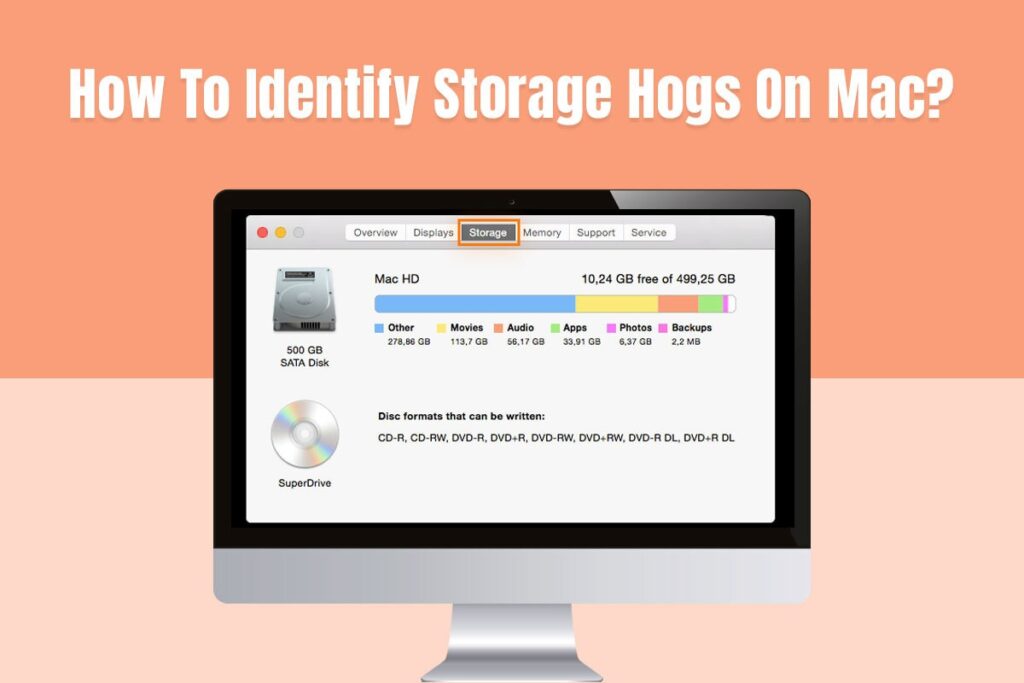
- About This Mac – You will find About This Mac by clicking the Apple Menu. Then, click Storage, and you will see a detailed breakdown of your storage usage. It will be divided into categories, such as Applications, Library, System, Mail, Documents, iCloud Drive, etc.
- Finder – You view storage in Finder by clicking disk > Get Info. By utilizing the Get Info window, you will get storage information on all the different folders on your Mac. For instance, right-click on the Downloads folder or any other folder where you suspect storage hogs are harbored and choose Get Info. The resulting window will show you the total size of the folder and its contents. You can even sort the information by size to quickly identify the most space-consuming files and folders. The same steps can be repeated within subfolders.
If using these built-in tools is not enough to manage your Mac’s storage, you can check out the third-party apps mentioned below.
- Third-Party Storage Analyzers
Using the built-in tools is a good starting point, but if you want a more granular view of your storage usage, you can utilize third-party applications. These applications sometimes delve deeper and categorize files by types, such as documents, applications, photos, videos, etc. The popular apps are mentioned below:
- DaisyDisk and Disk Inventory X – These two applications offer visual representations of your storage usage. Disk Inventory X shows colored bars that depict storage consumption by folders and files. So, this allows you to pinpoint large files. On the other hand, DaisyDisk offers a more graphical approach and displays folders and files as pie charts.
- iStat Menus – This is an application that allows users to keep tabs on the overall performance and health of your Mac. You can also see how much memory your system has left by clicking the MEM tab.
- Treemap Visualization – This is an open-source and free application that represents folders and files as rectangles. The rectangle’s size correlates to its storage consumption and makes it easy to quickly spot the most space-consuming folders and files.
So, you can utilize the different tools mentioned above to effectively identify the storage hogs that are lurking on your Mac. Once you know the different items that are taking up space, it will become easier to develop a strategy to reclaim the space and improve the performance of your system.
How To Reclaim Your Mac’s Storage Space?
Armed with the knowledge of where your storage space has gone, it is time to look at some strategies to reclaim the space. Once reclaimed, there will be a visible improvement in your Mac’s performance. It won’t function slowly and sluggishly anymore.
- Utilize Management Recommendations
One of the easiest ways to manage storage space on your Mac is by using the management recommendations provided by your system when you click About This Mac > Storage and select the Manage button. Under this section, you will find suggestions for optimizing your storage space.
Additionally, you can click Optimize Storage to let your system manage your space without your input. Your Mac will automatically optimize your system’s storage.
Additionally, when you click the Manage button, you might see options like Reduce Clutter, Store in iCloud, or Empty Trash Automatically. You can choose the option/options that make the most sense to you. These recommendations will serve as a starting point for your storage reclamation journey.
But if this doesn’t reclaim the amount of space you need, you can try the other methods mentioned below.
- Target Irrelevant Applications
Applications can take up significant space on your computer. Review all the different apps that are installed on your computer and identify the ones that are essential and the ones that have served their purpose. You can start by uninstalling the apps you no longer need. Then, you have to remove all the caches and leftover files that might still linger after the apps have been uninstalled.
- Tame The Downloads Folder
The Downloads folder can quickly become a digital graveyard if you are not careful. This folder might become the place for temporary files, forgotten installers, and outdated documents.
You must schedule regular visits to this folder to delete the items you no longer need.
- Tackle Large Files
Large files might take up a lot of space on your system. These might include forgotten music libraries, old movies you will never watch or bulky photo collections. Tackling these files might be tricky because some of them may be precious.
So, you can delete the ones you don’t need. The ones that are precious to you can be transferred to an external storage device or stored in iCloud. Then, you can remove the files from your system.
- Empty The Bin
The files you are deleting are still on your system. They are sent to the Bin. Hence, you must regularly check the Bin and permanently delete all the files. Until the Bin is emptied, these files continue to take up valuable space on your system.
- Clear browsing data and download history
You may not realize this, but your web browsing history, cookies, and cache are quietly getting accumulated in the background. Over time, these become storage hogs as well. You can clear your browsing history and reclaim space by opening Safari > clicking System Preferences > choosing Privacy > clicking Manage Website Data. Then, you can review the website data you don’t need and remove them.
Similarly, you must review and tackle the download history by opening Safari > clicking Downloads. If there are files you no longer need, you must remove them.
- Reset to factory settings
Have you tried all the steps mentioned above and your Mac’s storage space is still full? Fret not because there’s one final trick for you – factory reset.
Factory reset is the last resort because it erases all the applications and data from the computer. However, if the above mentioned methods have not yielded significant results, a factory reset can provide you with a clean slate. Please remember to back up important files before attempting a factory reset.
The Bottom Line
Now, you know how to identify and remove storage hogs from your Mac so your system can work smoothly. This will also ensure you have ample space on your computer to install more apps or download more files. It is prudent that you make it a habit to regularly clear clutter so your digital workspace is optimized, organized, and capable of functioning at lightning-fast speed.
Do you have anything to add? Leave a comment.